The OutFlo HubSpot integration connects your CRM contacts with your LinkedIn outreach workflow. You can bring a HubSpot contact segment into OutFlo, use those contacts in lead lists and campaigns, and send important outreach outcomes back to the matching HubSpot records.
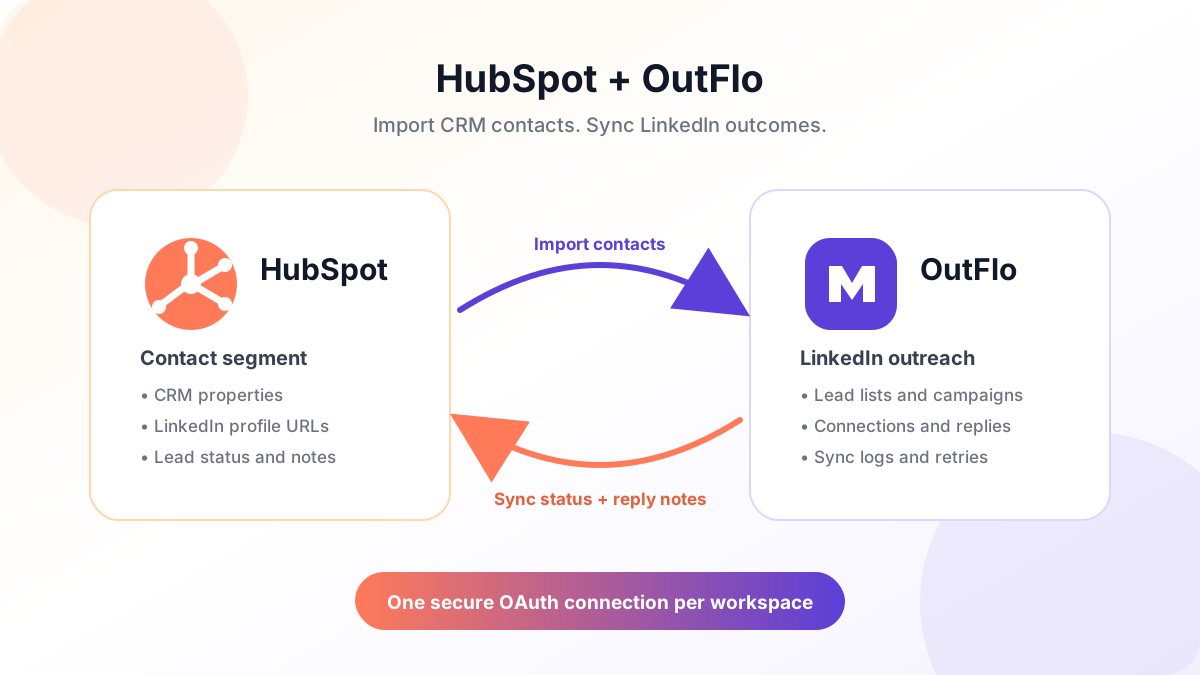
What the Integration Does
The integration creates a two-way workflow between HubSpot and OutFlo:
- Direction
- HubSpot to OutFlo
- What happens
- Import contacts from a HubSpot contact segment into a new OutFlo lead list.
- Direction
- OutFlo to HubSpot
- What happens
- Update a selected HubSpot contact property when a connection is accepted or a reply is received.
- Direction
- OutFlo to HubSpot
- What happens
- Add reply activity as a note on the matching HubSpot contact.
- Direction
- HubSpot to OutFlo
- What happens
- Detect deleted or merged contacts so OutFlo does not continue syncing to an invalid CRM record.
| Direction | What happens |
|---|---|
| HubSpot to OutFlo | Import contacts from a HubSpot contact segment into a new OutFlo lead list. |
| OutFlo to HubSpot | Update a selected HubSpot contact property when a connection is accepted or a reply is received. |
| OutFlo to HubSpot | Add reply activity as a note on the matching HubSpot contact. |
| HubSpot to OutFlo | Detect deleted or merged contacts so OutFlo does not continue syncing to an invalid CRM record. |
Each OutFlo workspace has its own HubSpot connection. Agencies can therefore connect a different client HubSpot account inside each client workspace without mixing CRM data.
Before You Start
You will need:
- Access to the OutFlo HubSpot beta.
- Permission to manage integrations in the current OutFlo workspace.
- A HubSpot user who can install Marketplace apps and approve contact and segment permissions.
- A HubSpot contact segment containing the people you want to import.
- A HubSpot contact property containing each person's LinkedIn profile URL.
The LinkedIn URL property is important. OutFlo uses it to create the lead and maintain the durable link between the OutFlo lead and HubSpot contact. Contacts without a valid LinkedIn profile URL are reported in the import preview and are not imported.
Step 1: Connect Your HubSpot Account
- 1.Sign in to OutFlo and switch to the workspace you want to connect.
- 2.Open your profile settings and select Integrations.
- 3.Select HubSpot.
- 4.Click Connect HubSpot.
- 5.On HubSpot's authorization screen, choose the correct HubSpot account.
- 6.Review the requested permissions and click Connect app.
HubSpot returns you to OutFlo after authorization. The connection panel displays Connected, along with the HubSpot account and portal ID.
OutFlo requests only the permissions needed to read contact properties and segments and to update the contacts involved in your workflow. The connection is authorized with HubSpot OAuth; you never paste a private access token into OutFlo.
Step 2: Configure Field Mapping
Open the Setup tab after connecting.
Select the LinkedIn URL property
Under LinkedIn profile URL property, select the HubSpot property that contains LinkedIn profile URLs. This selection is required before you can preview or import a segment.
Map standard contact fields
Choose which HubSpot properties should populate these OutFlo lead fields:
- First name
- Last name
- Job title
- Company
- Phone
The standard HubSpot properties are selected by default, but you can replace them with custom properties if your CRM uses a different data model.
Choose when HubSpot status changes
If you want OutFlo to update a CRM status, select a writable HubSpot dropdown property under HubSpot status property. Then enable one or more triggers and choose the HubSpot value to write for each one:
- Connection accepted — fires when the lead accepts a LinkedIn connection request.
- First reply received — fires on the first reply from a lead in an OutFlo campaign.
- Every reply received — fires whenever that campaign lead replies.
For example, you can map Connection accepted to Connected on LinkedIn and First reply received to Replied in your CRM status property.
Add reply notes
Turn on Add replies as HubSpot notes to place an OutFlo activity note on the matching contact when a reply trigger runs. The note includes the campaign and a link back to OutFlo.
Enable Include a short message excerpt if your team also wants the beginning of the reply in HubSpot. Leave it disabled if you prefer to keep message content only in OutFlo.
Click Save mappings when the configuration is complete.
Step 3: Prepare a HubSpot Contact Segment
In the HubSpot account you connected:
- 1.Go to CRM → Segments. If CRM is hidden in your navigation, open More → CRM → Segments.
- 2.Click Create segment.
- 3.Select Contacts as the record type.
- 4.Add the filters or contacts you want to use.
- 5.Save and process the segment.
- 6.Confirm that the contacts have values in the LinkedIn URL property selected in OutFlo.
Both active and static contact segments can be imported. An active segment changes membership automatically in HubSpot, while a static segment represents a fixed set unless you manually update it.
An OutFlo import is a point-in-time operation. If HubSpot later adds contacts to an active segment, run another import when you want those new members in OutFlo.
Step 4: Preview and Import the Segment
Return to OutFlo and open Integrations → HubSpot → Import.
- 1.Select the HubSpot contact segment.
- 2.Enter the name for the new OutFlo lead list, or keep the suggested name.
- 3.Click Preview import.
The preview reports:
- Total contacts checked.
- Contacts with valid LinkedIn URLs.
- Contacts with missing or invalid LinkedIn URLs.
If the preview looks correct, click Import into OutFlo. OutFlo creates a lead list and shows the import progress, including added, updated, skipped, and failed rows.
No HubSpot contact is deleted or removed from its segment during this process.
Step 5: Use the Imported Leads in OutFlo
Open the new lead list in OutFlo and use it as the source for a campaign. From this point, OutFlo remembers which lead came from which HubSpot contact.
That link is what enables status and note sync. When an enabled event occurs for an imported lead, OutFlo finds the linked HubSpot contact and performs the configured update.
Leads that were added to OutFlo through another source are not automatically linked merely because they have the same name. Import them through the HubSpot integration if you need their activity synced to HubSpot.
Step 6: Monitor Sync Activity
Open the Logs tab on the HubSpot integration page to review outbound deliveries. Each log entry shows the operation, status, contact, attempt count, timestamp, and any error returned by HubSpot.
Typical operations include:
- Updating a HubSpot contact status.
- Creating a reply note associated with a HubSpot contact.
OutFlo automatically retries temporary HubSpot failures such as rate limits and server errors. If a delivery remains failed after the automatic attempts, use Retry in the log after resolving the underlying issue.
What Happens When a HubSpot Contact Is Deleted?
HubSpot notifies OutFlo when a connected contact is deleted. OutFlo marks the CRM link as deleted and stops sending future status updates or notes to that contact.
The corresponding lead is not removed from OutFlo campaigns or lead lists. Deleting CRM data and removing an outreach lead are separate actions.
Disconnecting HubSpot
To disconnect, open Integrations → HubSpot and click Disconnect.
Disconnecting immediately stops new imports and outbound synchronization for that workspace. It does not delete:
- Contacts or notes already stored in HubSpot.
- Lead lists or campaign leads already stored in OutFlo.
- Historical sync logs.
You can reconnect later, but events that occurred while disconnected are not backfilled automatically.
Troubleshooting
The HubSpot card is not visible
The integration is in beta. Confirm that your OutFlo organization is enrolled and has the HubSpot integration beta enabled.
My segment does not appear
Confirm that you created the segment in the same HubSpot account shown as connected in OutFlo. Wait until HubSpot shows the segment as processed, then refresh the OutFlo page. Only contact segments appear in the selector.
The preview reports zero valid LinkedIn URLs
Return to Setup and verify that you selected the correct LinkedIn URL property. Then inspect a few HubSpot contacts and confirm that the property contains full LinkedIn profile URLs.
A contact status did not update
Check all of the following:
- The lead was imported through this HubSpot connection.
- The relevant trigger is enabled.
- A writable HubSpot status property is selected.
- The trigger has an assigned HubSpot option value.
- The HubSpot contact has not been deleted.
- The Logs tab does not show a failed delivery.
A reply note did not appear
Confirm that Add replies as HubSpot notes is enabled and that a reply trigger is active. Then check the Logs tab for the contact and retry any failed delivery.
I connected the wrong HubSpot account
Disconnect it, switch to the intended OutFlo workspace, and connect again. Always verify the HubSpot account name on the authorization screen before approving access.
Recommended First Test
Start with one HubSpot contact before importing a large segment:
- 1.Create a static contact segment containing one test contact.
- 2.Add a valid LinkedIn profile URL to the mapped property.
- 3.Preview and import it into OutFlo.
- 4.Add the OutFlo lead list to a test campaign.
- 5.Enable one status trigger and reply notes.
- 6.Produce the corresponding event and confirm it in HubSpot and the OutFlo Logs tab.
Once that end-to-end test succeeds, repeat the import with your production segment.