The Instantly integration lets you send OutFlo leads directly to an Instantly email campaign or lead list. You can add a selected group from your lead list or use a step in an OutFlo campaign to send leads when they reach a particular point in your sequence.
Use OutFlo for your LinkedIn workflow and Instantly for email outreach. If you want to collect prospects for review before emailing them, choose an Instantly lead list as the destination.
Before you start
You will need:
- An OutFlo workspace.
- An Instantly account with API access.
- An Instantly API v2 key with access to campaigns, lead lists, and leads.
- A campaign or lead list already created in Instantly.
The API key is simply the connection key you paste into OutFlo. No coding is required. Keep it private, just as you would a password.
1. Connect Instantly to your OutFlo workspace
- 1.In Instantly, open Settings → Integrations → API Keys and create a key for OutFlo. Choose access to campaigns, lead lists, and leads. Use a v2 key; an older v1 key will not work for this connection. See Instantly’s API v2 guide for help with the key version.
- 2.Copy the key.
- 3.In OutFlo, select the workspace where you want to use Instantly.
- 4.Open Settings, then the Integration tab.
- 5.Find Instantly and select Configure.
- 6.Paste the key into Instantly API key and select Connect Instantly.
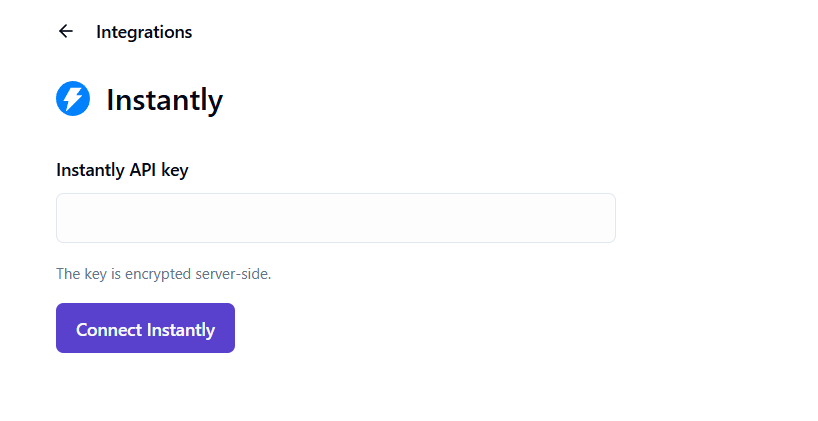
After connecting, you can browse Campaigns and Lead lists on the integration page. Use Refresh to update the available destinations after creating something new in Instantly.
2. Choose a campaign or a lead list
Choose the destination based on what you want to happen next:
- Destination
- Campaign
- Use it when
- You want the leads to enter an email sequence
- What happens
- Leads are added to the selected campaign. Sending follows its status, sequence, and schedule.
- Destination
- Lead list
- Use it when
- You want to store or review the leads for later
- What happens
- Leads are added to the list without starting email outreach.
| Destination | Use it when | What happens |
|---|---|---|
| Campaign | You want the leads to enter an email sequence | Leads are added to the selected campaign. Sending follows its status, sequence, and schedule. |
| Lead list | You want to store or review the leads for later | Leads are added to the list without starting email outreach. |
For example, send reviewed prospects to your “Product Demo Follow-up” campaign. Send prospects still waiting for review to a “Review Before Outreach” lead list.
Before choosing a campaign, check its emails, sending accounts, status, and schedule in Instantly. A running campaign may start contacting eligible leads according to its settings.
3. Add selected OutFlo leads to Instantly
- 1.Open your lead list in OutFlo.
- 2.Select the individual leads you want to add.
- 3.Open Lead actions and select Add to Instantly.
- 4.Choose Campaign or Lead list.
- 5.Select the destination.
- 6.Choose the Email column that contains the addresses you want to use.
- 7.Check the preview for valid, missing, and invalid emails, including the example addresses.
- 8.Select Add to Instantly.
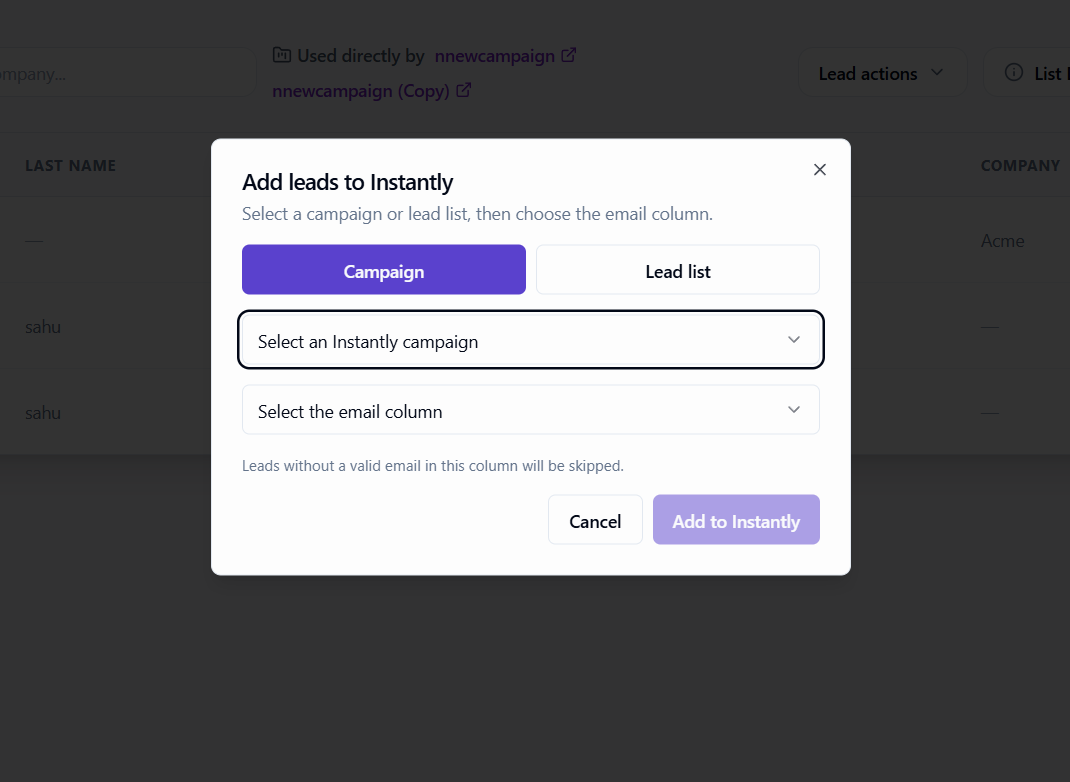
If your list contains more than one email field, check the preview carefully. Choosing a work email column, for example, tells OutFlo to use those addresses for this handoff.
Missing and invalid emails are skipped. Correct those addresses before adding those leads again. OutFlo remembers the email-column choice for that list.
You can add up to 1,000 leads per submission. Select individual leads rather than using a selection that spans all pages.
4. Automate the handoff in an OutFlo campaign
Add an Instantly step when you want leads to move to email outreach or a holding list as part of your LinkedIn workflow.
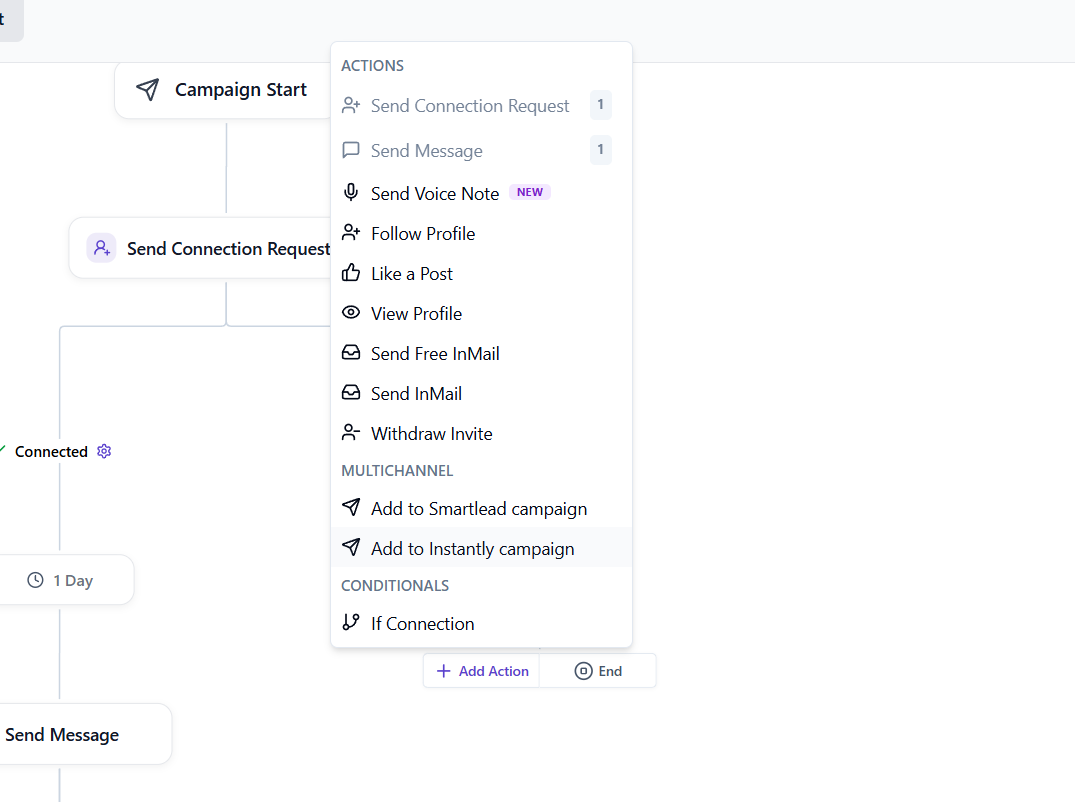
- 1.Open the sequence editor for your OutFlo campaign.
- 2.Select Add Action, then Add to Instantly campaign under Multichannel, at the point where you want the handoff.
- 3.In the step settings, choose Campaign or Lead list.
- 4.Select the Instantly destination.
- 5.Choose the Email variable containing each lead’s address.
- 6.Save the step and review your sequence before launching the campaign.
Although the action is named Add to Instantly campaign, its settings also let you choose a lead list.
The email variable is the campaign field containing an address for each lead. Make sure it is populated before leads reach the step. A lead without a valid email in that field skips the step.
Leads are added when the step runs. Choosing a lead list stores them; choosing a campaign lets Instantly’s campaign settings determine when emails are sent.
5. Review results and confirm your leads arrived
- 1.Open Integration → Instantly.
- 2.Choose the Campaigns or Lead lists tab.
- 3.Find the destination and select View linked leads.
- 4.Use the refresh action to check the latest lead information.
Total provider leads is the full lead count returned by Instantly for that destination. Linked to Outflo counts leads with a saved connection to OutFlo. The numbers may differ if the destination also contains leads added elsewhere. A dash means Instantly did not return a total.
If you get stuck
- What you see
- The key is rejected
- What to do
- Check that it is a v2 key with access to campaigns, lead lists, and leads. Copy it again without extra spaces.
- What you see
- Your destination is missing
- What to do
- Create it in Instantly, refresh in OutFlo, and check the correct tab and connected account.
- What you see
- Add to Instantly is unavailable
- What to do
- Check the workspace connection and your permissions, then select individual leads.
- What you see
- Leads are skipped
- What to do
- Check the email-column preview or the email variable in your campaign step.
- What you see
- Leads arrived but emails did not start
- What to do
- Confirm you selected a campaign. A lead list stores leads; campaign delivery follows Instantly’s status, sequence, and schedule.
| What you see | What to do |
|---|---|
| The key is rejected | Check that it is a v2 key with access to campaigns, lead lists, and leads. Copy it again without extra spaces. |
| Your destination is missing | Create it in Instantly, refresh in OutFlo, and check the correct tab and connected account. |
| Add to Instantly is unavailable | Check the workspace connection and your permissions, then select individual leads. |
| Leads are skipped | Check the email-column preview or the email variable in your campaign step. |
| Leads arrived but emails did not start | Confirm you selected a campaign. A lead list stores leads; campaign delivery follows Instantly’s status, sequence, and schedule. |
If you replace your Instantly key, open the integration page and select Update API key to save the new one.
For a similar workflow with Smartlead, see the Smartlead integration guide.